EPIC SYStem
epic front office training
INTRODUCTION TO EPIC
Introducing the EPIC (Education Paging Intercom Communications) System®. Built specifically for K-12 education, EPIC provides the latest technology to make communication in your school not only easy but efficient—all communications are no more than two touches away.
-
EPIC 2.5+
-
Legacy EPIC
The graphical user interface, makes it a breeze for the front office to communicate with any classroom in the school. With an interactive campus map and touchscreen monitor, the front office staff has the whole school at their fingertips.
The EPIC System incorporates the SAFE (Signal Alert for Education) System®, which provides discreet alert buttons on XD Teacher Microphones and in the front office that can be pressed to send an alert signal through the EPIC System server.
Easy to navigate
Quick communication

Incorporates SAFE System®

Full campus map
PREPARING TO USE EPIC
Users can access EPIC from any computer on the network using Google Chrome. To access the system, use the IP address or web address that was assigned by the district IT department. Kiosk login information is located in the user manual.
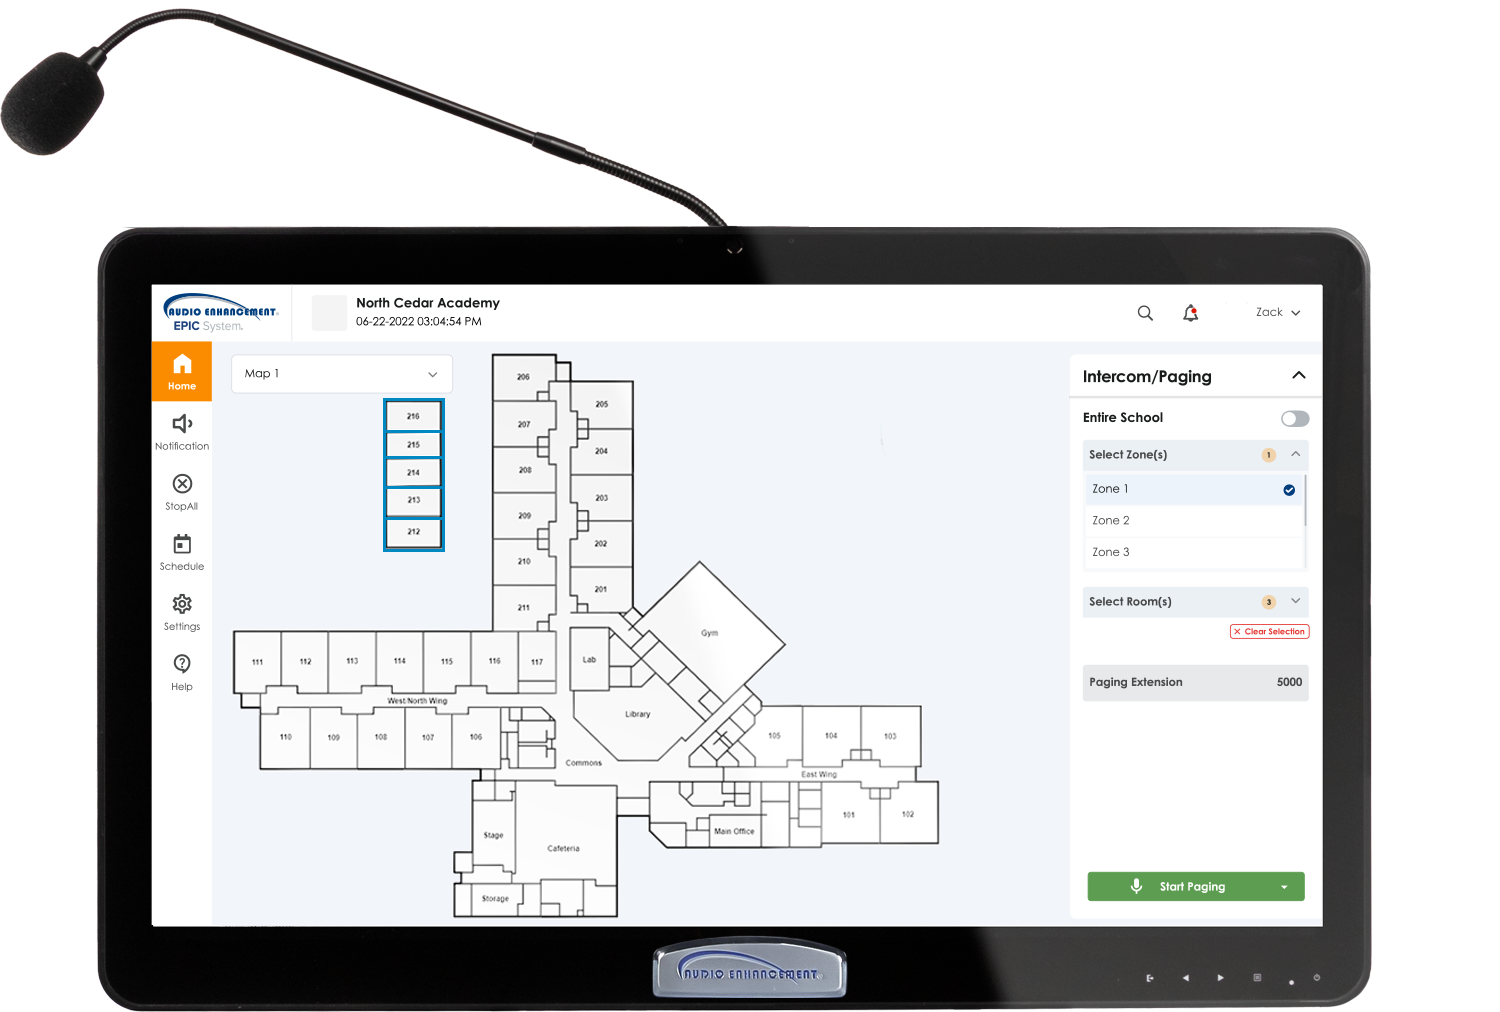
A school administrator account has been created for use when configuring the system. Do not use the EPIC Kiosk default login from other locations. Intercom and paging functions are only supported from the kiosk. Other user accounts are for configuration and SAFE System functions only.
Multiple users can act as admin in the EPIC System. Admin have the ability to create and customize more user accounts as needed. This will be covered later in the course, or Audio Enhancement can help configure this by contacting support below.
INTERCOM CALLS
An intercom call is a two-way communication call. It’s live audio in both directions, just as you speak with someone on the phone. Anyone with appropriate credentials can answer and initiate EPIC intercom calls with one or two clicks from the easy to use touch screen console.
Initiating Intercom Calls
Making an intercom call to a classroom requires you to select the room from your interactive map, then the intercom button. End the call when you are ready with the red end button that appears when you are in an active call.
RECEIVING Intercom Calls
Receiving an intercom call is simple with a single click of the accept button. The red end button will appear after you are in an active call and can be pushed when you wish to end the current call.
PAGING
Paging is one-way communication to multiple locations or the entire school. You will not be able to hear a response back from the classrooms when performing a page. Page locations are controlled by zones created in EPIC
There are three different ways to page in EPIC:
- Entire School. Click the toggle for Entire School in the upper righthand corner of the EPIC Home Page. This will select the entire campus. Click page and begin speaking. Click Stop Paging to end the page.
- Zone Specific Paging. Select a zone or zones to page from the list in the upper right-hand corner. Click Start Paging. Click Stop Paging to end the page.
- Dynamic Paging. Select any classrooms and or zones to page. Click Start Paging. Click Stop Paging to end the page.
NOTIFICATIONS
A notification is a prerecorded message or tone that can be played upon demand. It can play across the entire system in classrooms, hallways, and exterior areas.
Calendar
The calendar is used to set the bell schedule for a specific day. Any zones used by the bell system must be created by a school administrator.
EPIC Admin Training
introduction to epic
Introducing the EPIC (Education Paging Intercom Communications) System™. Built specifically for K-12 education, EPIC provides the latest technology to make communication in your school easy and efficient—all communications are no more than two touches away.
The graphical user interface makes it a breeze for the front office to communicate with any classroom in the school. With an interactive campus map and touchscreen monitor, the front office staff has the whole school at their fingertips.
The EPIC System incorporates the SAFE (Signal Alert for Education) System™, which provides discreet alert buttons on XD Teacher Microphones and in the front office that can be pressed to send an alert signal through the EPIC System server.
Easy to navigate
Quick communication

Incorporates SAFE System®

Full campus map
preparing to use epic
Users can access EPIC from any computer on the network using Google Chrome. To access the system, use the IP address or web address that was assigned by the district IT department. Kiosk login information is located in the user manual.
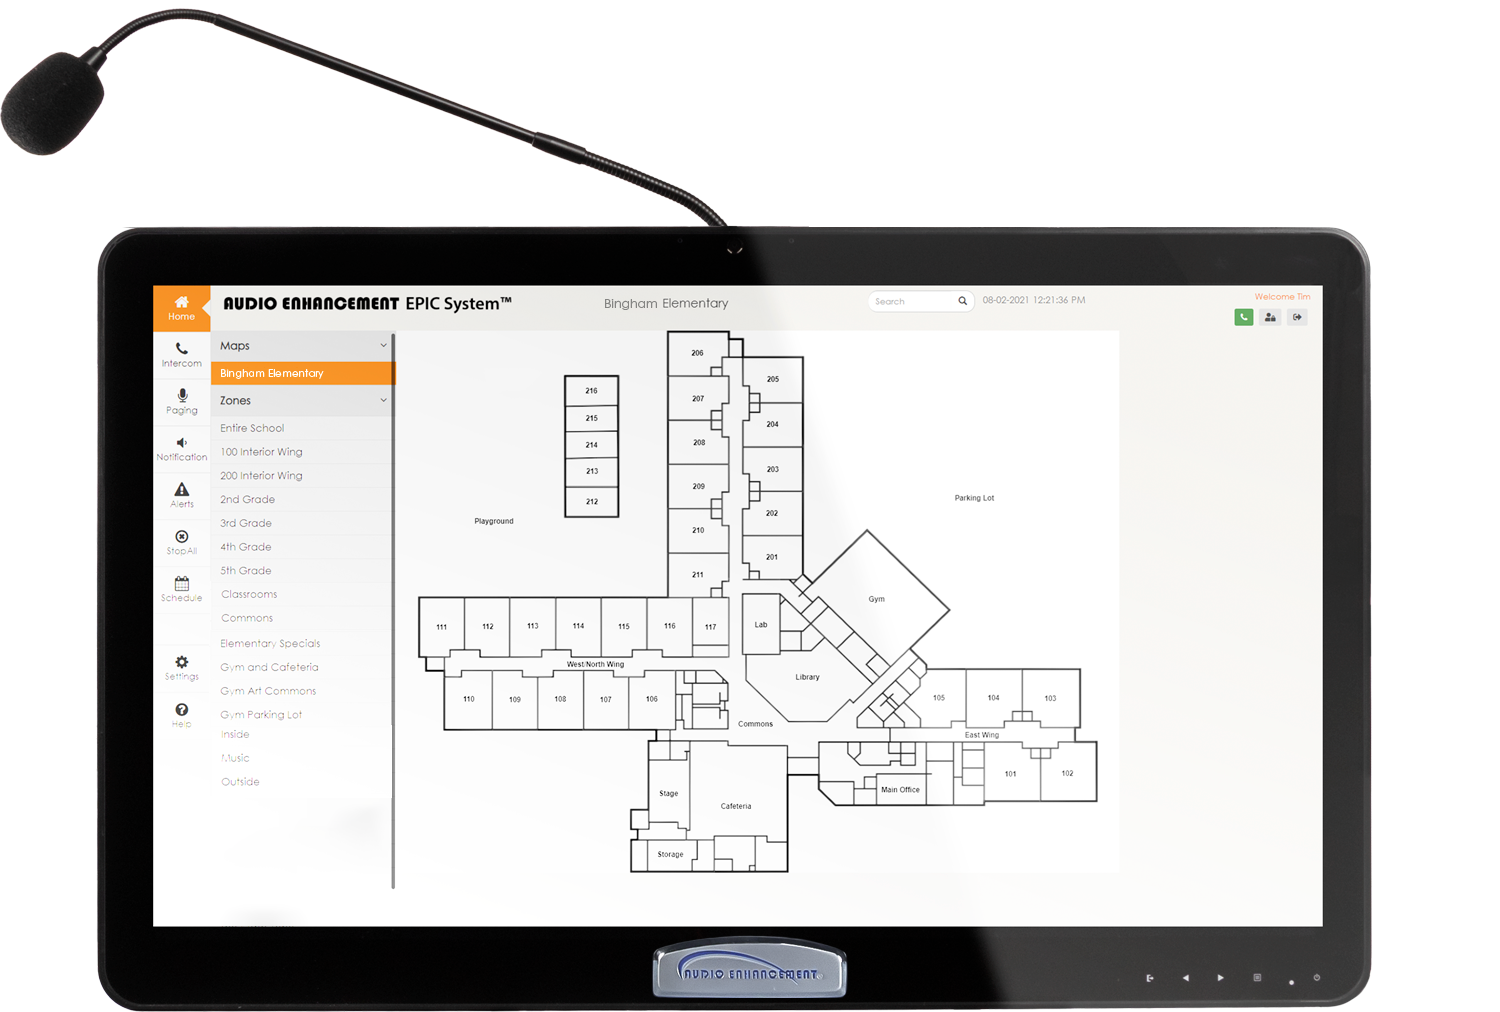
A school administrator account has been created for use when configuring the system. Do not use the EPIC Kiosk default login from other locations. Intercom and paging functions are only supported from the kiosk. Other user accounts are for configuration and SAFE System functions only.
Multiple users can act as admin in the EPIC System. Admin have the ability to create and customize more user accounts as needed. This will be covered later in the course, or Audio Enhancement can help configure this by contacting support below.
intercom calls
An intercom call is a two-way communication call. It’s live audio in both directions, just as you speak with someone on the phone. Anyone with appropriate credentials can answer and initiate EPIC intercom calls with one or two clicks from the easy to use touch screen console.
Initiating Intercom Calls
Making an intercom call to a classroom requires you to select the room from your interactive map, then the intercom button. End the call when you are ready with the red end button that appears when you are in an active call.
RECEIVING Intercom Calls
Receiving an intercom call is simple with a single click of the accept button. The red end button will appear after you are in an active call and can be pushed when you wish to end the current call.
paging
Paging is one-way communication to multiple locations or the entire school. You will not be able to hear a response back from the classrooms when performing a page. Page locations are controlled by zones created in EPIC
Notifications
A notification is a prerecorded message or tone that can be played upon demand. It will play across the entire system in classrooms, hallways, and exterior areas.
safe alerts
SAFE System provides a systematic solution to communicate incidents quickly for immediate resolution. For the safety of faculty, teachers and students, quick alerts connect classrooms to the right people at the right time. Alert activation is easily accessible from the teacher microphone and from an alert notification button. A teacher can send alerts from anywhere on campus.
When a SAFE Alert is over an admin user must end the alert. Standard configuration does not allow front office standard users to end an alert. The administrator must go to their computer and log into the EPIC System and click end alert. A text box will appear and notes must be added in order to end the alert. If requested, Audio Enhancement can help add this ability to the front office kiosk user.
EPIC Calendar
The calendar is used to set the bell schedule for a specific day. Any zones used by the bell system must be created by a school administrator.
Bells
The EPIC System bell schedule was designed to simplify scheduling for school administrators. Bells can be configured to fit the specific needs of the school. From cleanup bells to assembly schedules, the bell schedule can be set to manage bells for the whole school, individual zones, or rooms.
DAY TYPE
Day type refers to the different types of bell schedules that will be used throughout the school year. The calendar can accept as many day types as need to be created. Start with known needs and existing bell schedules. More day types can be created later. Watch the video and create day types.
YEARLY CALENDAR
Creating and changing the calendar is easy. Before getting started, get a copy of the school year calendar. This information will be added to EPIC System calendar. If all the information isn’t available, changes can be made later. This video will walk through creating a calendar.
ZONES
Zone creation is what provides the most flexibility when using EPIC System. Zones are used for paging and bells. They allow audio to be broadcast to specific locations on campus. Zones can be added and adjusted at any time. When creating zones, a good place to start is with lunch shifts, grade levels, and electives. Using school maps and bell schedules will greatly assist in creating the needed zones.
BELL SCHEDULE
Best practice to build bell schedules is to have the standard day bell schedule on hand when starting to add bells. This should just be the beginning of creating the schedule in EPIC. Consider anytime a teacher or students will need a reminder that it is time to move. Art, STEAM labs, industrial arts, PE, computer labs, and science classes often need a reminder to start cleaning up and/or saving their work. With EPIC bells can ring in a single classroom.
CUSTOMIZING AUDIO
Adding custom music to the bell schedule can support a positive school culture. When using the recording feature in the EPIC System, scripts can recorded for all emergency notifications, the morning greeting, or even the pledge. Having a familiar voice in a calm tone can be very reassuring to students and faculty during an emergency. It is highly recommended that the principal records his or her own notifications for your campus. Ringtone websites can supply small audio clips that are perfect for bells. Be sure to always preview an entire audio clip when downloading from these sources. Some clips may not be school appropriate!
SYSTEM SETTINGS
As an administrator of the system you can access settings using the gear icon on the left side panel. The settings allow a principal access to all areas of the system. Below are the main settings an administrator would most commonly access.
MAP SETUP
As the administrator of EPIC System, the Map Setup tab is very important. Creating zones and assigning teachers to their rooms is the most frequent use. If the school is using room control for volume, projectors, interactive displays or VIEWpath, teachers will be in the system and will need to be assigned to their classroom. Zones are the key to being able to manage the intercom, paging, and bell system. Using zones, continue to think about other ways to have specific messages sent to predetermined areas of the school using zones.
One of the unique features of the EPIC System is the ability to record specific evacuation directions based on zones for designated sections of campus. These zones will be created the same way bell zones are created. They are used in the notifications and be configured in the events tab. View the video that will cover the rest of the functions of the map setup tab.
EVENT EDITOR
The event engine in EPIC provides great control and automation of the EPIC System, including integration into 3rd party systems. The event engine in EPIC can take input from multiple sources, analyze the data and perform actions based on that data.
There are three types of events that administrators should know how to edit (Email alerts, text message alerts, and notifications). For the remaining event items, contacting Audio Enhancement is recommended for assistance in configuration.
EVENT EDITOR-SMS & EMAIL
It is also recommended that districts or schools set up email groups to be used with SAFE Alerts. Once the group is configured changes can be made to the group without the need to make changes in the EPIC server.
The policy and procedures to be followed once a SAFE alert is received is created and distributed by the school or district that implemented the EPIC system.
SYSTEM SETTINGS
The system setting tab contains most of the settings for configuring the appearance and users for the system.
There are three types of events that administrators should know how to edit (Email alerts, text message alerts, and notifications). For the remaining event items, contacting Audio Enhancement is recommended for assistance in configuration.
When a SAFE Alert is over an admin user must end the alert. Standard configuration does not allow front office standard users to end an alert. The administrator must go to their computer and log into the EPIC System and click end alert. A text box will appear and notes must be added in order to end the alert. If requested, Audio Enhancement can help add this ability to the front office kiosk user.
INFOVIEW
introduction to INFOVIEW
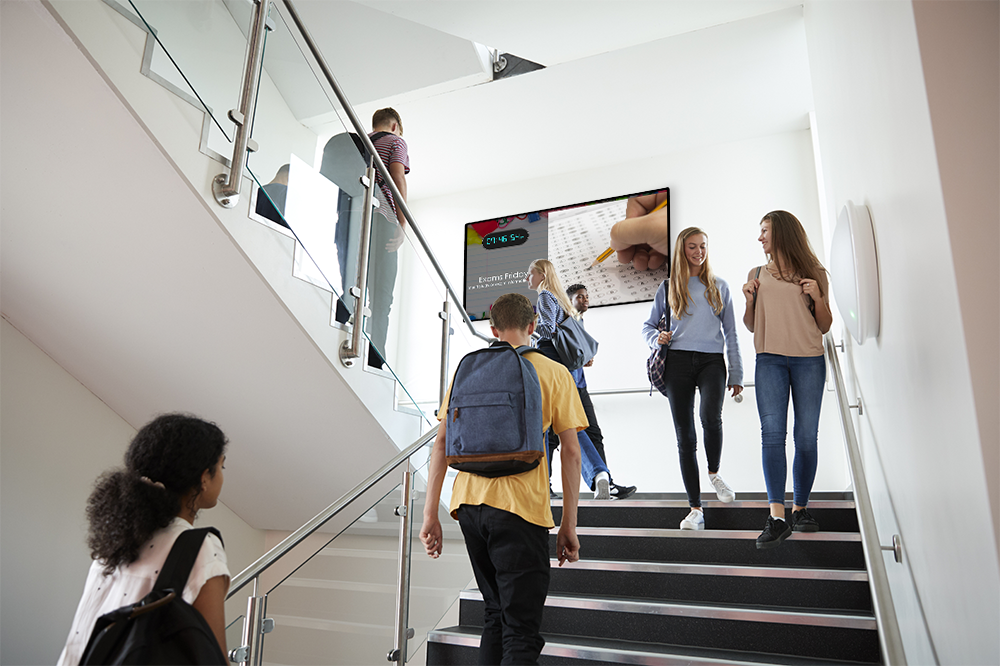
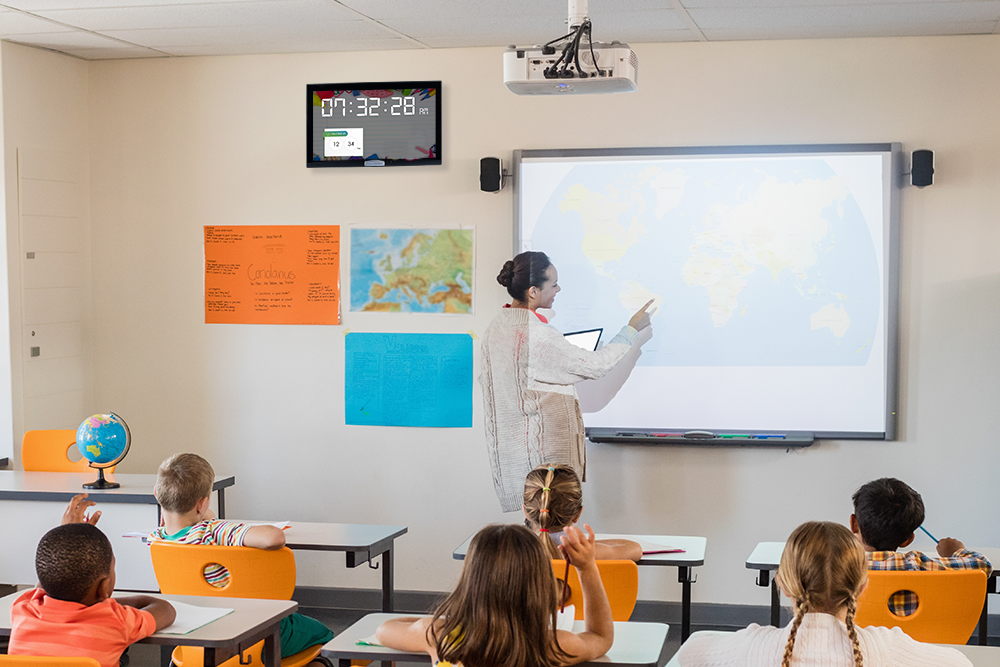
InfoView's Intuitive interface empowers school InfoView administrators to easily customize clocks and digital signs. Add announcements, images, scrolling messages and show the time of the next bell. In emergencies, InfoView shows critical information and adds visuals to any audible notification transmitting in the school
Easy to navigate
Quick communication

Incorporates SAFE System®

Full campus map
ADDING DEVICES
DEVICE SETTINGS
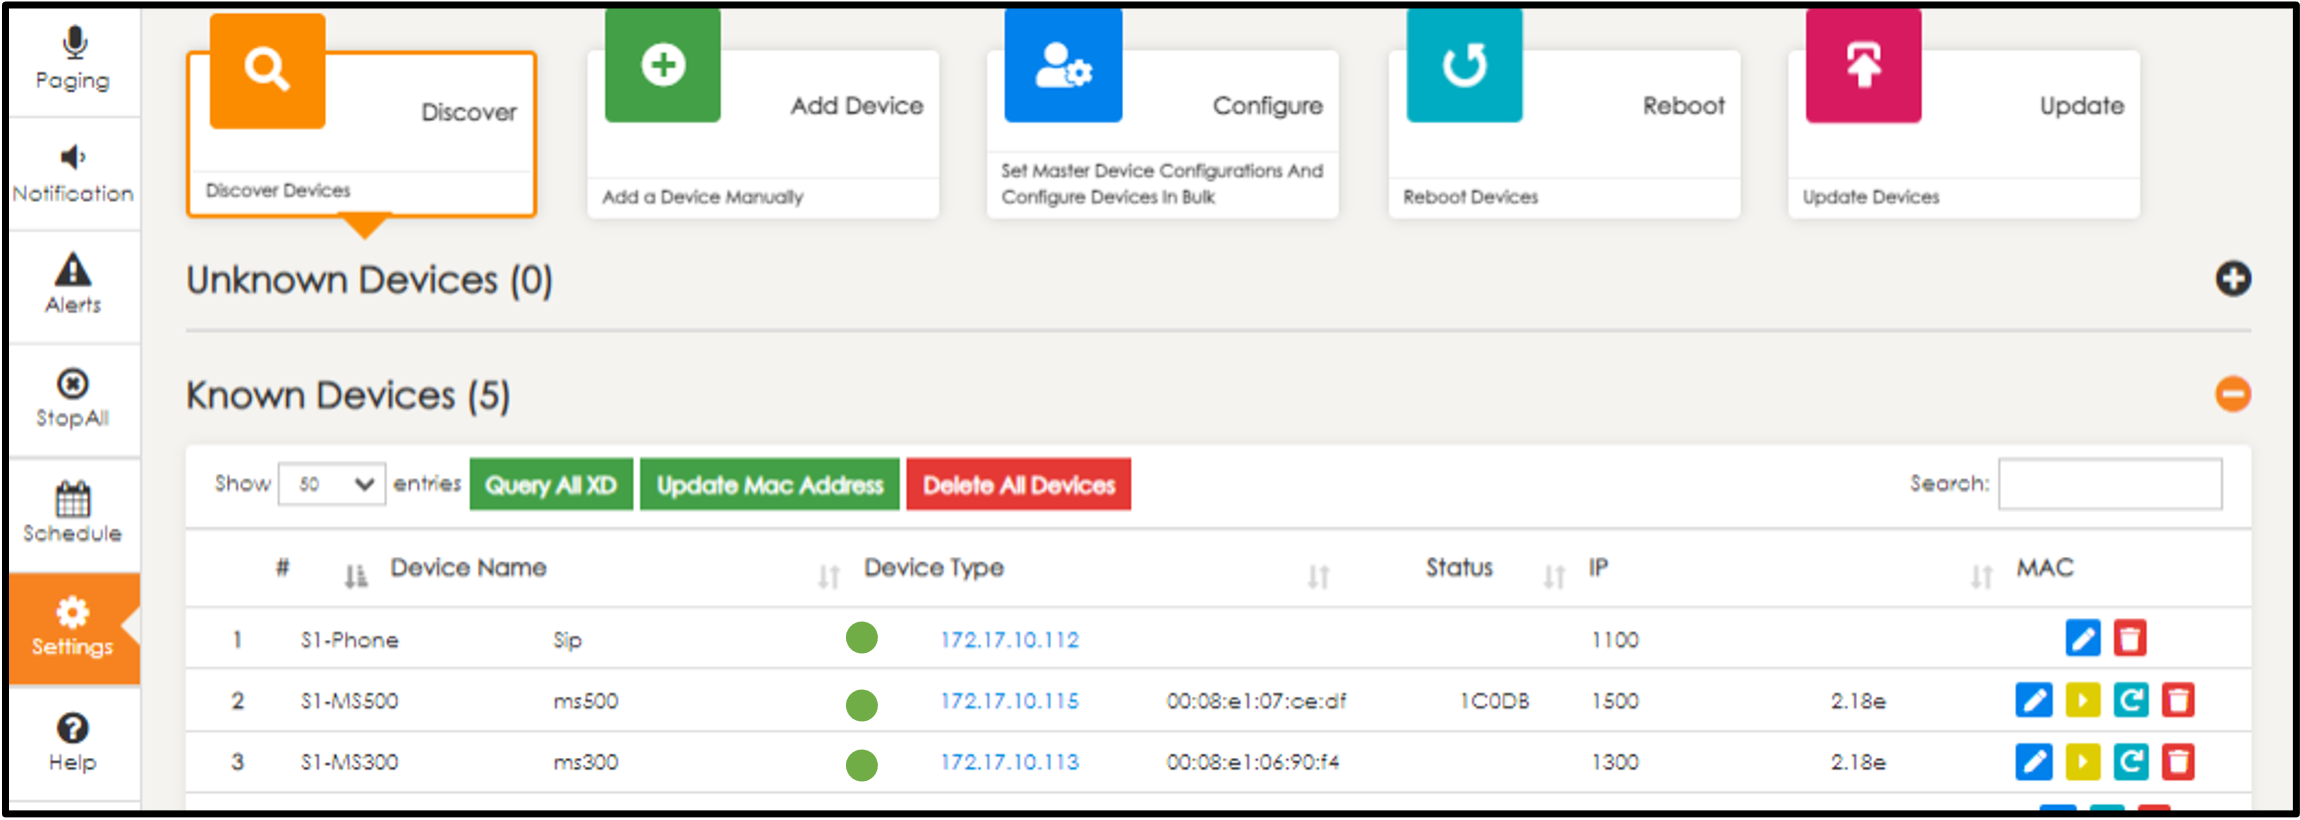
Adding InfoView devices in EPIC is just like adding amps or cameras and the settings are managed completely by EPIC System.
DEVICE CONNECTION
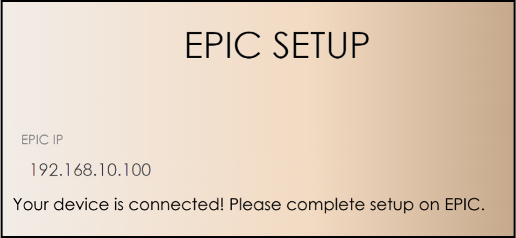
The device will immediately attempt to find EPIC System if the device is on the same network. If the devices aren’t on the same LAN or automatic discovery fails, the device has an out of the box setup mode with a manual configuration
DIGITAL SIGNAGE
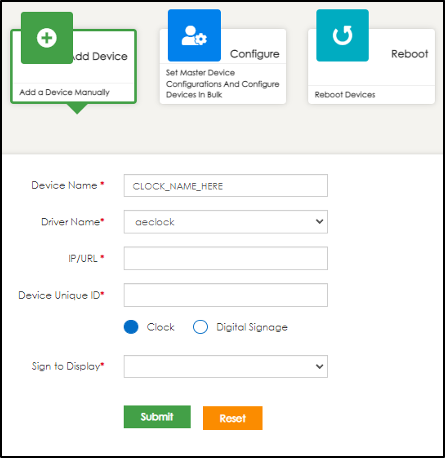
When adding the devices to EPIC System, there is an option for “clock” or “digital signage”. Selecting digital signage will allow for “image carousels” and scrolling text messages as well as a schedule to change the content on the digital signs. In most cases, digital signage should only be used for larger, commons area digital signage displays. Digital signage requires a separate license on a recurring annual basis.
YEARLY CALENDAR
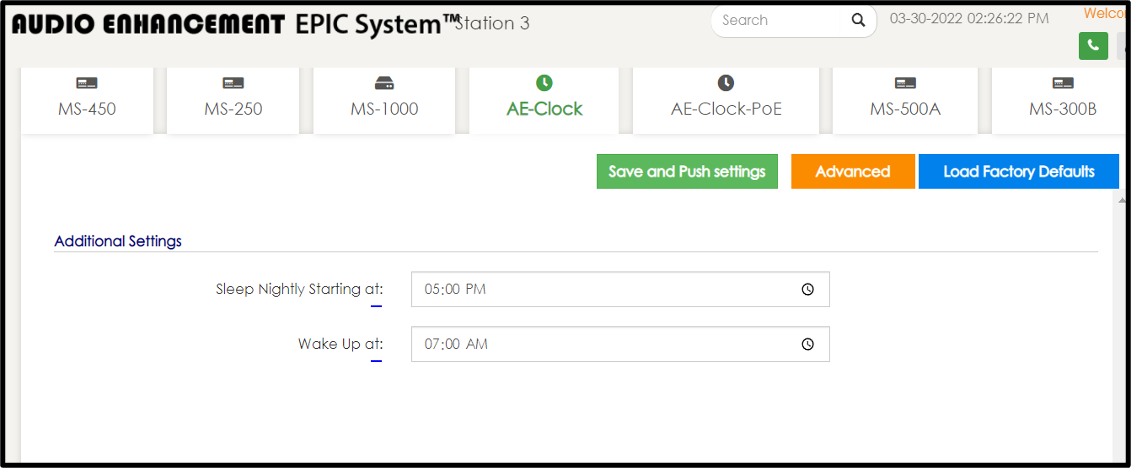
InfoView devices can follow a sleep schedule where they will display a basic, low powered clock. Admins can edit this schedule using the edit pencil for that device or using the Configure menu to change it all devices.
SIGN EDITOR
ADDING A NEW SIGN
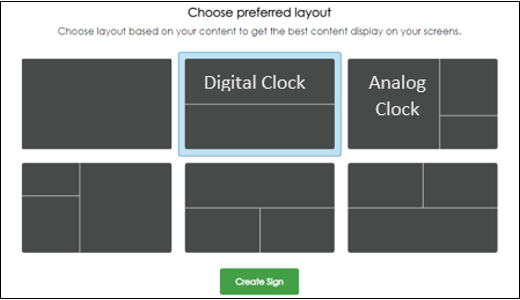
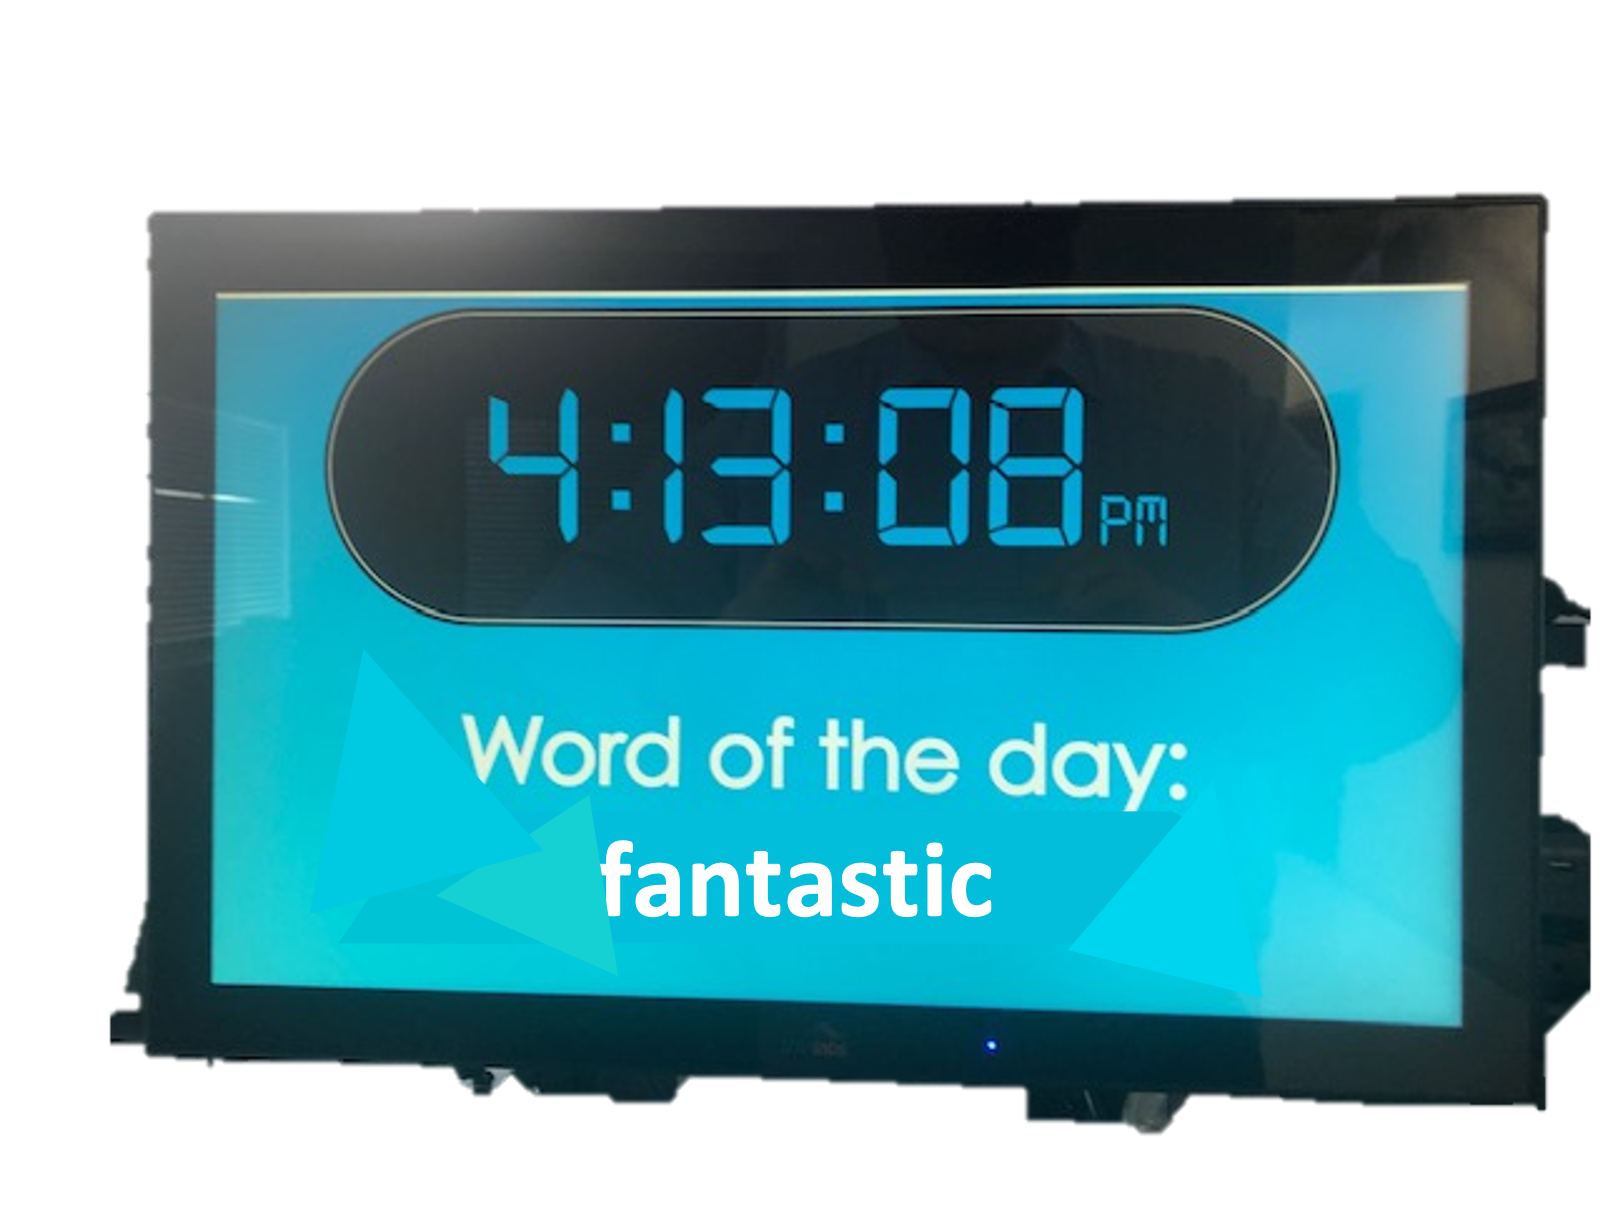
• To add a new sign, first pick a layout
• Sections have addable “widgets” – clock, announcement, image, next bell
• Layout of a specific sign cannot be changed once selected.
• For clocks, some layouts are better suited for digital clocks (wide format), and some are better for analog clocks (square format).
NAMING SIGNS
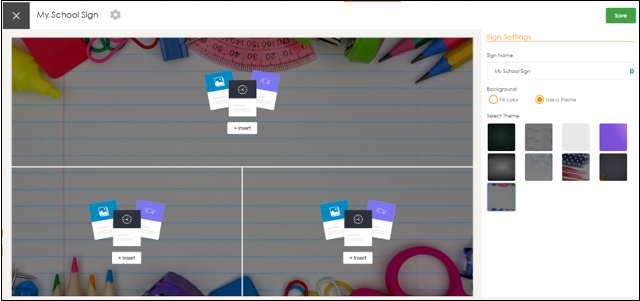
• After selecting the layout, the sign editor will appear. Notice the right panel.
• All editing of any section will be done in this pane.
• Name the sign (It is recommended that users pick something easy to search and identify later.)
Sections
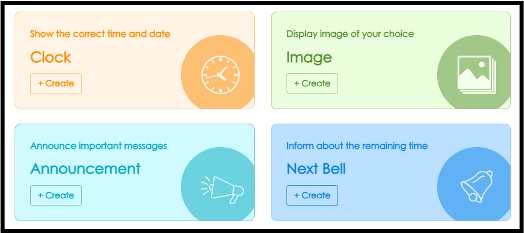
• Select a background, static single color or “Use a theme” to use one of the built-in backgrounds
• Then click + Insert on any of the sections to add the content
• Select widget--can be deleted or changed later
• Users can return to the “Sign Settings” to rename the sign or change the background at any time--click the settings gear near the sign name (top left of sign editor).
Widgets
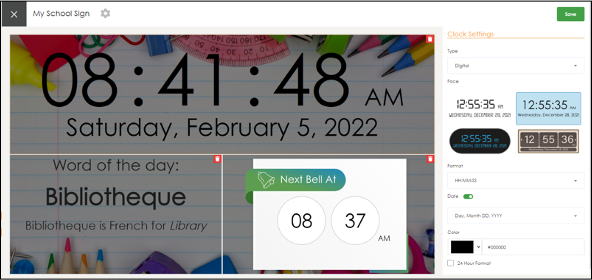
• Widgets have unique properties that users can edit
• Images can be uploaded, font faces and colors can be changed
• Upon selecting a widget, all properties will be managed in the right panel of the sign editor. The user can select from the various options (Clock type, face, time format (with/without seconds), date display, format and the color of the clock text on the sign).
clock settings
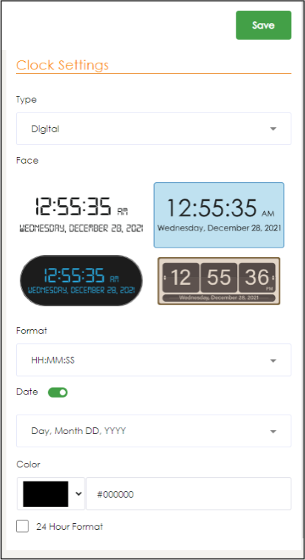
• Select widgets for each section until the sign is ready to go
• To change the property of a section, click back on that section and the edit panel for that section will appear again
• To completely change a section, including changing the widget type for that section, click the delete icon to clear that section content and then click + Insert to start over
• Click save to finalize the design and save the sign
• Users will be prompted that there are unsaved changes if they try to navigate away from the sign or click the x.
ASSIGNing TO DEVICES
EPIC makes it easy when a user wants to change what is displayed on the actual physical devices
DEVICES

• Click the Devices menu within the Clock & Signage section
• A list of all devices will display, separated on two tabs: Clock and Digital Signs
ASSIGNING
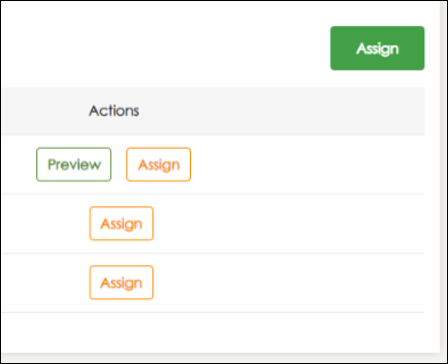
• Users will see all the devices in the system and what sign is currently assigned to each
• Preview to see a snapshot of the sign assigned to that device
• Users can search to filter specific devices to easily find and change any specific sign
• Click Assign next to any device to choose a new sign
SCHEDULE
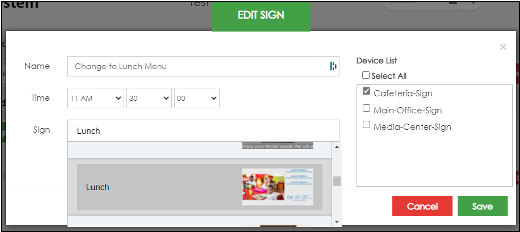
• Using the Schedule tab, digital signs can be assigned to change on a schedule.
• Navigate to schedule and in the dropdown, select Digital Signage. Follow the same principles of the bell schedule to assign a schedule to the digital signs in the school.
• Create day types and add events throughout the day to change the sign to be displayed on selected devices at specific times of the day.
• Assign those day types to the specific days on the calendar and that signage schedule will run on those days
manage sign library
The calendar is used to set the bell schedule for a specific day. Any zones used by the bell system must be created by a school administrator.
DAY TYPE
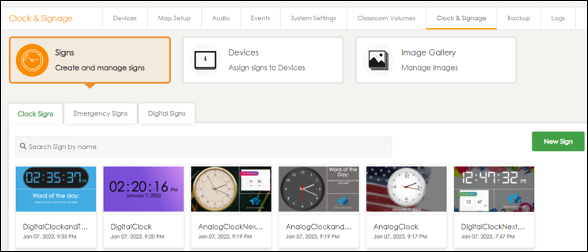
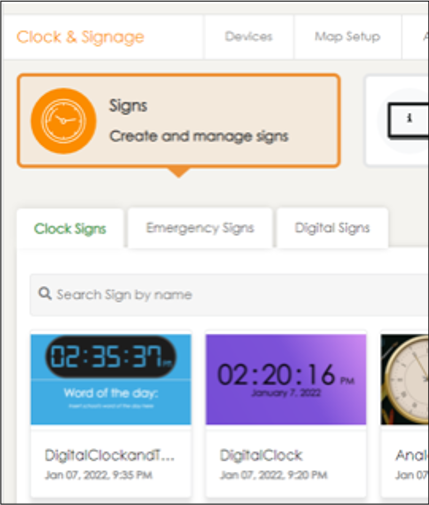
Navigate to Settings > Clock & Signage. The landing page will be the Signs menu. Users can manage all the available signs that can be assigned to a device.
Clock Signs: assigned to devices marked as clocks
Emergency Signs: can display on every endpoint when added to a Notification event
Digital Signs assigned to devices marked as digital signs
YEARLY CALENDAR
• Users can edit the existing templates or add new signs
• The most recently updated signs will appear at the top of the list
• Real time updating: If a user edits and saves a sign already being displayed on devices, the update will display immediately
• Hover on top of a tile to edit or delete an existing sign.
Emergency notifications
SELECTING EVENTS
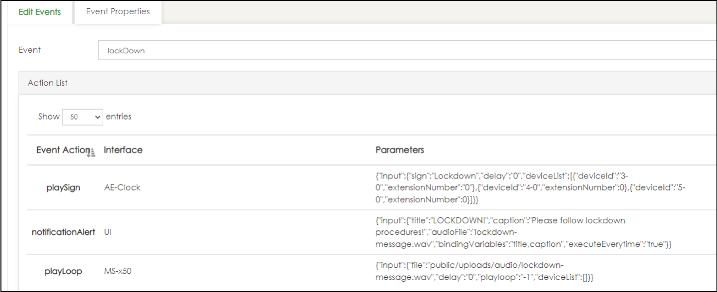
The emergency signs will be linked to a notification event. To assign emergency signs to the event, navigate to Settings > Events and select the event too customize.
EDITING EVENTS

• Edit the existing playSign event or scroll down to add a new event
• Device Type=AE-Clock
• Event Action=playSign
• Select sign to be associated with that event (ex:Lockdown)
• Choose the devices that will receive that sign when this notification event is triggered.
• Users can add multiple playSign actions to the same event to different sets of devices, allowing specific signs to show different content most appropriate for specific areas of the school.
• All selected devices will show the selected emergency sign for the duration of the event.
• When the event is over users can press the stop or All Clear to revert to the sign that was displayed prior to the notification event.
MANAGING EVENTS
• Every device in the school can immediately switch to display visual notifications in the case of an emergency
• Specific emergency notification signs can be created and customized
• Use the Clock & Signage section and select the emergency signs tab to view and add or customize the emergency signs
• Users can upload any customized image or create a customized announcement text.

9858 South Audio Drive, West Jordan, UT 84081
Toll Free: 800-383-9362
SAFE (Signal Alert for Education) System™ (patent pending) is an alert notification system not intended to be a life-saving device or prevent emergencies. Audio Enhancement, our agents, employees, subsidiaries, affiliates and parent companies are exempt from liability for any loss, damage, injury or other consequence arising directly or indirectly from the application of our equipment. In the event of misuse or malfunction of the SAFE System or any of its components, Audio Enhancement, our agents, employees, subsidiaries, affiliates and parent companies are exempt from liability for any loss, damage, injury or other consequence arising directly or indirectly therefrom.


